XAITK Tutorial
A guide to running XAITK Saliency via checkmaite.
NOTE: XAITK Saliency can be used in the checkmaite framework for both image classification (IC) and object detection (OD) tasks. This tutorial will only cover the OD scenario.
What is XAITK Saliency?
The xaitk-saliency package is an open source component within the Explainable AI (XAI) Toolkit. It offers visual saliency algorithm interfaces and implementations, built for analytics and autonomy applications.
NOTE: Although XAITK saliency and the black box tools demonstrated below are only a subset of the larger XAITK framework, we will refer to them as just "XAITK" in the rest of the tutorial for simplicity.
In short, XAITK works as follows:
- Begin with a model and an image (or small dataset)
- Use the model to make an initial prediction
- Repeatedly perturb the image by applying masks which occlude portions of the original image
- Compare the model's predictions on the perturbed images to the original prediction
- Areas of the image that, when occluded, result in the model's prediction to change are determined to be most salient, or important, to the original prediction
The XAITK algorithms applied in this demonstration all take a black box approach, meaning that they do not require access to the inner workings of a model in order to conduct analysis. Such algorithms have the advantage of applicability to any classifier or detector regardless of its architecture.
On the other hand, this approach does lead to increased computational complexity. For example, 1,000 or more masks (and thus the same number of model inferences) may need to be generated to produce a reasonable saliency map for a single image.
NOTE: While many of the JATIC tools integrated into checkmaite can run against multiple entire datasets and models, XAITK as a "rule of thumb" should only be applied to an interesting subset of the data due to the computational requirements outlined above. The saliency heat maps also generally require human judgement to interpret so choosing a few important images to review (e.g. perhaps where model predictions differ, or where an adversarial attack has succeeded) is more important than generating in large quantity.
Overview and Background
This section will outline the aspects of the algorithm and configurations most relevant to applying xaitk-saliency to Object Detection problems similar to checkmaite's original use case.
For more in-depth reading on the tool, visit:
- XAITK Saliency documentation
- Hu, B., Tunison, P., RichardWebster, B., & Hoogs, A. (2024). Xaitk-Saliency: An Open Source Explainable AI Toolkit for Saliency. Proceedings of the AAAI Conference on Artificial Intelligence, 37(13), 15760-15766. https://doi.org/10.1609/aaai.v37i13.26871
The Perturber Stack
The following sections will introduce the perturber algorithms as well as the XAITK saliency parameters n, s, p1, and fill.
This is the XAITKTestStage configuration which we will use as our baseline as we demonstrate the features of the XAITK perturber stack.
{
    "name": "MyXAITKTestStage",
    "saliency_generator": {
        "type": "xaitk_saliency.impls.gen_object_detector_blackbox_sal.drise.DRISEStack",
        "xaitk_saliency.impls.gen_object_detector_blackbox_sal.drise.DRISEStack": {
            "n": 1, # Increase this as needed
            "s": 20,
            "p1": 0.5,
            "seed": 42,
            "threads": 8,
            "fill": [
                111,
                112,
                111
            ]
        }
    },
    "img_batch_size": 8,
}
The configurations under the saliency_generator key are specific to XAITK. We will demonstrate the effects of changing exactly one of these parameters in each of the following examples, with two exceptions:
- seed - refers to the random number generator seed
- threads - concurrent mask-generation threads. Note that with more than one thread there are some race conditions that may result in slightly different results (e.g. masks being applied differently for random grid). This is likely only relevant if the user is doing an exact comparison with past results.
Perturber Algorithms - DRISE and RandomGrid
Two perturber stacks are available for Object Detection - DRISEStack and RandomGridStack. The only core difference between the two is its masking method.
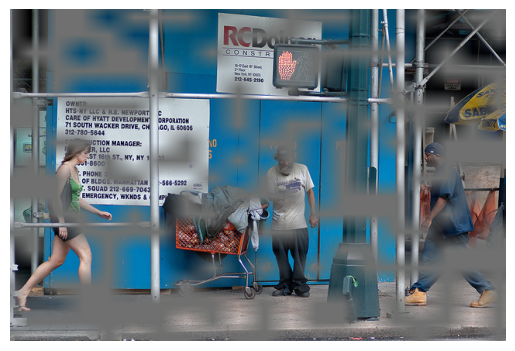
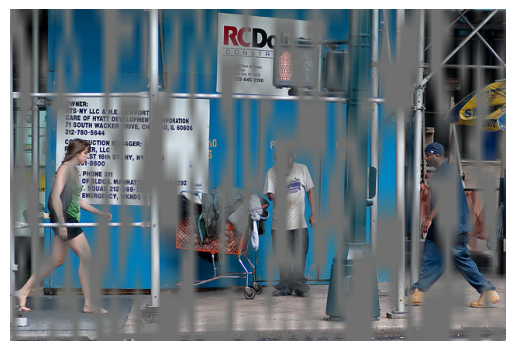
DRISEStack uses an NxN fixed grid overlay, whereas RandomGridStack generates randomized fixed-size binary masks independent of image resolution. This means that RandomGridStack potentially has finer-grained control over the size/aspect ratio of the masking, but this is very dataset-dependent.
This mask was generating using DRISEStack and all of the other parameters in the configuration above.
This mask uses RandomGridStack. All of the other parameters are the same except s (defined below) which is specified as a [50,10] rectangular area, hence the vertical "striping".
"n" - The Number of Masks
The parameter n refers to the number of masks applied to each image. This is the most computationally-intensive dial in the XAITK configuration. Because a separate model inference is run for each generated mask, time to complete increases linearly with n. This burden should be weighed against the need for many masks for better results. Too few masks may result in a very imprecise saliency map, or one that results in random "shadows" throughout the image caused by areas that, by chance, happened to be unoccluded at the same time as the truly sailent part of the image.
As a general rule of thumb, when the size of the detected bounding boxes is small relative to the dimensions of the overall image, a higher n will be required to generate an accurate and detailed map.
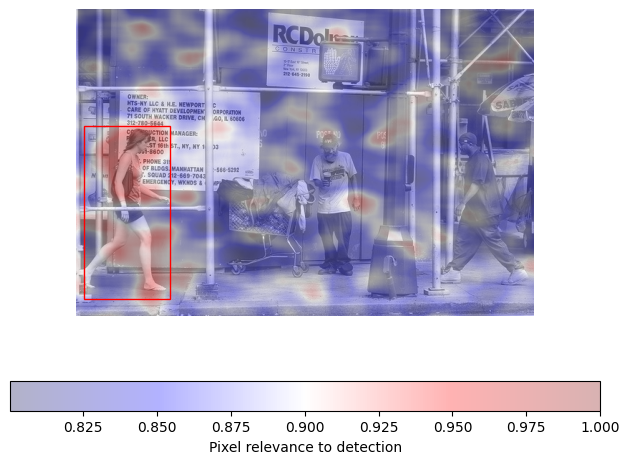
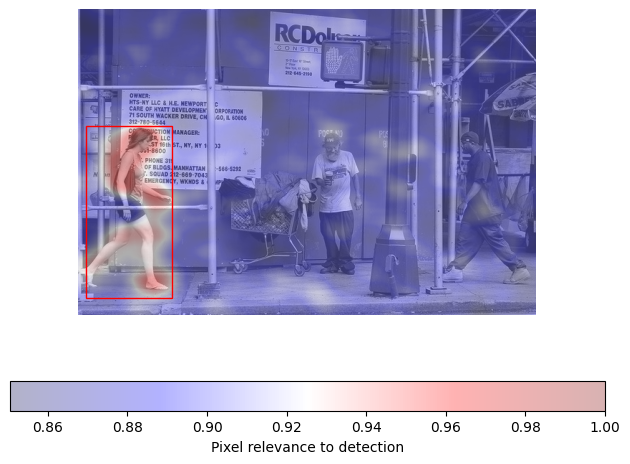
NOTE: Red areas in the maps below are 'more salient'. See the following sub-section for more on how to interpret this.
The saliency maps below are associated with the detection of "person" displayed as a red box in the lower left region of the image.
This first example was generated with n=200.
Increasing to n=1000 results in a more meaningful map with decreased "noise" and more precision on which parts of the person (face, arms, foot) are most salient to the model's decision.
A Note on Saliency Scores
In the example above, we noted that "red areas are more salient" but this is difficult to quantify.
In terms of raw numbers, each pixel is provided a saliency score in [-1,1] where:
- Positive values mean a pixel is more salient to a detection (where
1means that the model did not make an accurate prediction any time the pixel was occluded) - "0" means the presence/absence of the pixel was irrelevant to the detection
- Negative values mean the pixel actively lowers the likelihood that the model predicts the class of interest when it is not occluded
The report generator within XAITKTestStage applies saliency with the jet color map (blue=low -> red=high) over the original greyscale image. So red is more salient, but the magnitude of the values will vary by indivdiual detection map so check the accompanying color bar scale before interpreting.
"s" - The size (dimensions)
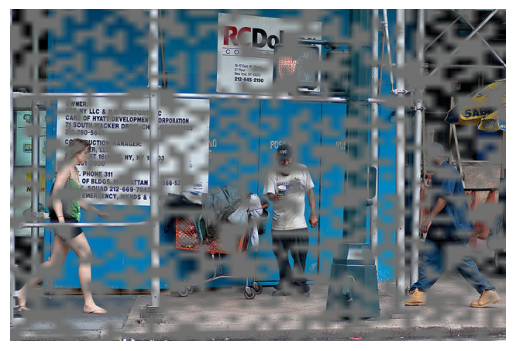
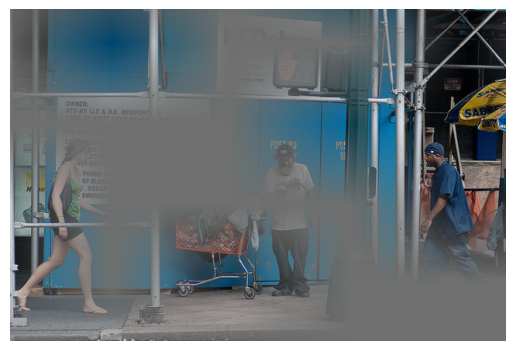
The s parameter controls the relative size of the occluded areas in the image. Here, the two stack algorithms have different configuration properties.
For
DRISEStack(and other RISE implementations),srefers to the spatial resolution of the original masking grid. That grid is then upsampled to a size which covers the pixel space of the full image, and cropped and shifted randomly to remove bias. For these stacks, a larger s results in a higher resolution mask. For the intuition, consider thats=3would produce a grid with a spatial resolution roughly of a tic-tac-toe board the size of the image, whiles=8would produce a grid with the resolution of a chess board (but of course randomly shaded, not with the odd-even pattern). Also, it is possible/likely that the upsampled mask is larger than the image which is where cropping comes in.For
RandomGridStack,sis a (H,W) rectangular basis, in pixels, for constructing a mask. For this stack, larger values in [H,W] equate to courser masks. Intuitively, consider thats=[10,2]would mean taking "tiles" of 10 pixels tall but 2 wide and applying, shifting, and cropping them randomly, resulting in skinny vertical striping, whiles=[20,50]would result in random pattern based on a large, horizonal rectangle.
This D-RISE Stack mask uses s=50.
And this mask uses s=5.
"p1" - The Occlusion Probability
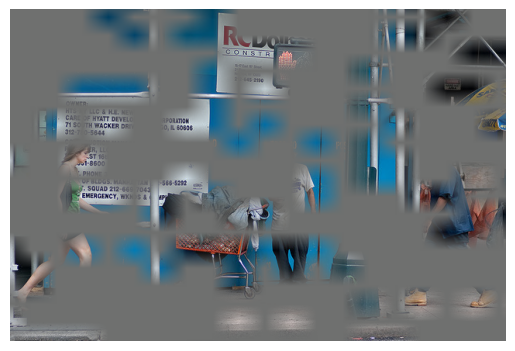
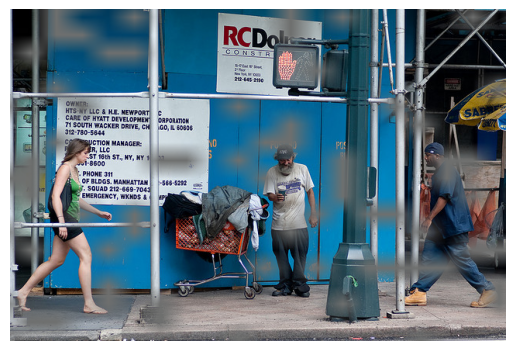
p1 is the probability that any given pixel is NOT occluded. It simply takes a value in [0,1] where 0 is every single pixel occluded and 1 is no occlusion at all.
Here is an example with p1=0.2.
And here is an otherwise equivalent configuration where p1=0.8.
"fill" - Fill Color
The fill parameter is used to control the pixel shift of occluded images, specified as RGB values. In short, simply "occuluding an image" by dimming the pixels to black (RGB [0,0,0]) may not be neutral. For instance, if the model is looking for white objects on a dark background, occluding with black may have minimal effect since it blends with the background. However, using a white fill in that same context could actively confuse the detector by mimicking the target object. Additionally, pretrained models often zero-mean their input images as part of their pre-processing, and these mean values are dataset-dependent.
The best practice is to use the gray average of the dataset. At the end of this section is a code snippet example for calculating the gray average for our example COCO dataset.
All of the masked images above are using a fill value [111,112,111], the gray average for the small dataset used in the XAITK Test Stage example at the end of this notebook.
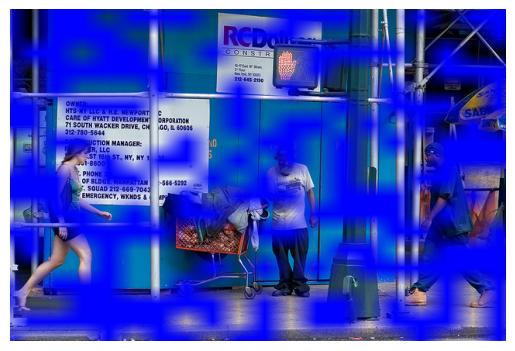
To illustrate the parameter's effect with an unusual example, this perturber is using a fill value [0,0,255].
from pathlib import Path

import numpy as np

from checkmaite.core.object_detection.dataset_loaders import CocoDetectionDataset

BASE_DIR = Path.cwd().parents[1]
dataset_root_path = BASE_DIR / "tests/data_for_tests/coco_dataset"
dataset_ann_file_path = BASE_DIR / "tests/data_for_tests/coco_dataset/ann_file.json"

print("Loading COCO dataset...")
# Use the example COCO dataset
dataset = CocoDetectionDataset(root=dataset_root_path, ann_file=dataset_ann_file_path, dataset_id="coco-example")
print(f"Dataset loaded with {len(dataset)} images")

channel_total_pixel_value = np.zeros(3, dtype=float)
channel_total_count = 0

for idx in range(len(dataset)):
    img = np.array(dataset[idx][0]).transpose(1, 2, 0)
    channel_total_pixel_value += np.sum(img, axis=(0, 1))
    channel_total_count += img[:, :, 0].size

gray = np.floor(channel_total_pixel_value / channel_total_count)  # can use np.ceil instead
gray
Loading COCO dataset...
Dataset loaded with 4 images
/home/runner/work/checkmaite/checkmaite/.venv/lib/python3.10/site-packages/xaitk_saliency/__init__.py:3: UserWarning: pkg_resources is deprecated as an API. See https://setuptools.pypa.io/en/latest/pkg_resources.html. The pkg_resources package is slated for removal as early as 2025-11-30. Refrain from using this package or pin to Setuptools<81.
  import pkg_resources
array([111., 112., 111.])
Sample Code for Mask Generation
Use the code below to experiment with the parameters for generating a masked image.
This snippet recreates the relevant parts of the mask-generating algorithm for a simplified use case without the complexity of calculating saliency.
from pathlib import Path

import matplotlib.pyplot as plt
import numpy as np
from PIL import Image
from xaitk_saliency.impls.gen_object_detector_blackbox_sal.drise import DRISEStack

BASE_DIR = Path.cwd().parents[1]
IMG_PATH = BASE_DIR / "tests/data_for_tests/coco_dataset/000000252219.jpg"

blackbox_perturb = DRISEStack(  # If changing to RandomGridStack, change 's' too
    n=1,  # Number of masks - leave at 1 for this demo
    s=20,  # NOTE: DRISE accepts int 's', RandomGridStack accepts list of int, length2
    p1=0.5,  # Probability of NOT occluding a pixel
    seed=42,  # For RNG
    fill=[  # See code in the 'fill' section for example of calculating grey average
        111,
        112,
        111,
    ],
)
img = np.asarray(Image.open(IMG_PATH))

# Mask is a (H,W) array with values [0,1].  We stack it for a (C, H, W) mask to apply to RGB image
mask = blackbox_perturb._perturber.perturb(np.asarray(img))[0]  # noqa: SLF001
mask_channels = np.array(3 * [mask]).transpose(1, 2, 0)

# Then apply the mask wtih an element-wise multiply across all 3 color channels per pixel
# So 0 turns pixel to fill, 0.5 blends 50-50, and 1 leaves unchanged
img_mask = (
    np.multiply(img, mask_channels)
    + np.multiply(np.full((mask.shape + (3,)), blackbox_perturb.fill), 1.0 - mask_channels)
).astype(int)

plt.imshow(img_mask)
plt.axis("off")
plt.show()

Running XAITK inside checkmaite
The following section uses the checkmaite API to run an XAITK test stage for Object Detection.
First, we create the two necessary MAITE-wrapped objects - a dataset and compatible model.
We use the CocoDetectionDataset wrapper. The data is found in our test directory, and is a four-image subset of the COCO 2017 test dataset.
We then use the TorchvisionODModel wrapper with ssdlite320_mobilenet_v3_large, an SSDlite model architecture with a MobileNetV3 Large backbone, with default weights pre-trained on COCO 2017 training set.
from pathlib import Path

from checkmaite.core.object_detection.dataset_loaders import CocoDetectionDataset
from checkmaite.core.object_detection.models import TorchvisionODModel

BASE_DIR = Path.cwd().parents[1]
dataset_root_path = BASE_DIR / "tests/data_for_tests/coco_dataset"
dataset_ann_file_path = BASE_DIR / "tests/data_for_tests/coco_dataset/ann_file.json"
model_name = "ssdlite320_mobilenet_v3_large"

print("Loading COCO dataset...")
# Use the example COCO dataset
dataset = CocoDetectionDataset(root=dataset_root_path, ann_file=dataset_ann_file_path, dataset_id="coco-example")
print(f"Dataset loaded with {len(dataset)} images")

model = TorchvisionODModel(model_name=model_name, model_id=model_name)
Loading COCO dataset...
Dataset loaded with 4 images
Next, we initialize an XAITKTestStage object, load the dataset and model wrapped above, and execute the test.
NOTE: The code below sets
n=1for quick execution, but the outputs will be meaningless (monochromatic and/or randomly colored boxes). Experiment with differentn(maybe 200-1000) to see valid results.
from checkmaite.core.object_detection import XaitkExplainable, XaitkExplainableConfig

xaitk_config_dict = {
    "name": "MyXAITKTestStage",
    "saliency_generator": {
        # Algorithm.  Can change DRISEStack to RandomGridStack
        "type": "xaitk_saliency.impls.gen_object_detector_blackbox_sal.drise.DRISEStack",
        "xaitk_saliency.impls.gen_object_detector_blackbox_sal.drise.DRISEStack": {  # Same change as line above
            "n": 1,  # Number of masks per image
            # The size of the objects in the occlusion grid. If stack is changed to
            # "RandomGridStack", this should be a list of length 2, i.e. [20, 20].
            "s": 20,
            "p1": 0.5,  # The probability of NOT occluding a pixel
            "seed": 42,  # RNG seed
            # Concurrent threads. Concurrency can lead to slightly different outcomes due to race conditions.
            "threads": 8,
            "fill": [  # Color for occluded pixels.  Standard is to set as the greyscale average of the dataset
                111,
                112,
                11,
            ],
        },
    },
    "img_batch_size": 8,
}
xaitk_config = XaitkExplainableConfig(**xaitk_config_dict)

capability = XaitkExplainable()
output = capability.run(use_cache=False, datasets=[dataset], models=[model], config=xaitk_config)
Failed to import psycopg2: No module named 'psycopg2'
Failed to import psycopg2: No module named 'psycopg2'
Failed to import caffe module: No module named 'caffe'
Failed to import psycopg2: No module named 'psycopg2'
/home/runner/work/checkmaite/checkmaite/.venv/lib/python3.10/site-packages/smqtk_detection/impls/detect_image_objects/centernet.py:897: FutureWarning: `torch.cuda.amp.autocast(args...)` is deprecated. Please use `torch.amp.autocast('cuda', args...)` instead.
  @autocast()
/home/runner/work/checkmaite/checkmaite/.venv/lib/python3.10/site-packages/torch/cuda/amp/autocast_mode.py:54: UserWarning: CUDA is not available or torch_xla is imported. Disabling autocast.
  super().__init__(
Failed to import psycopg2: No module named 'psycopg2'
/home/runner/work/checkmaite/checkmaite/.venv/lib/python3.10/site-packages/smqtk_classifier/impls/classification_element/postgres.py:27: UserWarning: psycopg2 not importable: PostgresClassificationElement will not beusable.
  warnings.warn(
/home/runner/work/checkmaite/checkmaite/.venv/lib/python3.10/site-packages/smqtk_classifier/impls/classify_descriptor_supervised/libsvm.py:46: UserWarning: svm/svmutil not importable: LibSvmClassifier will not be usable.
  warnings.warn(
Slide Deck
Once the test stage has completed, the code below uses the gradient package to create HTML and PPTX formatted reports of the results of the XAITK test stage.
import os

from checkmaite.core.report._markdown import create_markdown_output

output_dir = Path("xaitk_example_output")
os.makedirs(output_dir, exist_ok=True)

create_markdown_output(output.collect_md_report(threshold=0), output_dir, md_filename="XAITK_Example_Report.md")
print(f"Markdown report saved in {output_dir}.")
Markdown report saved in xaitk_example_output.